Windows 11 တွင် Focus assist ကို ဘယ်လို သုံးမလဲ ?
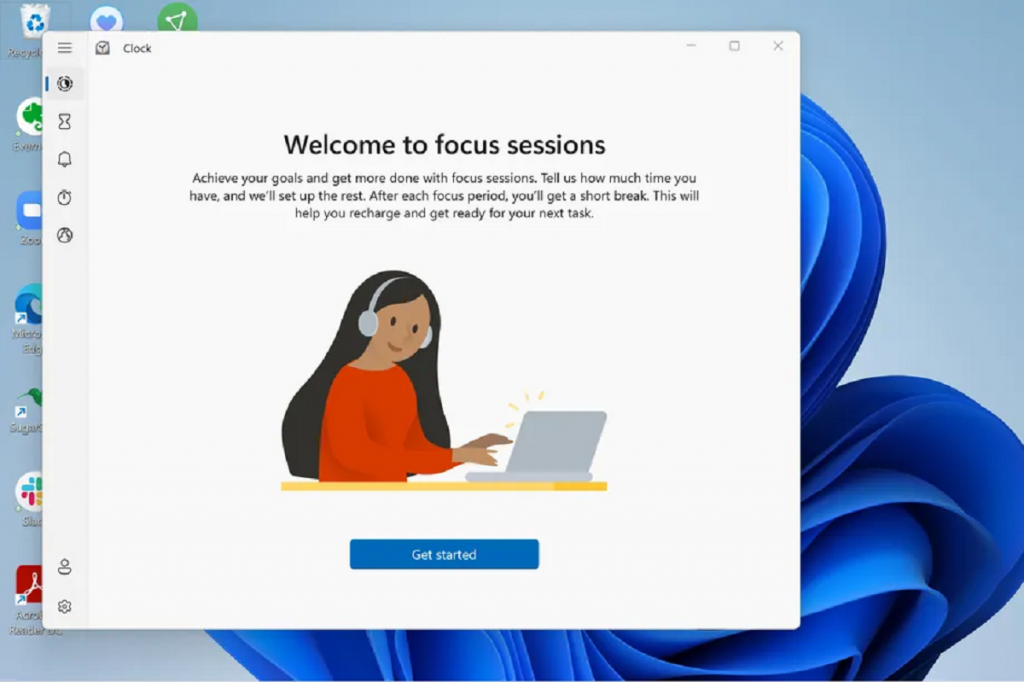
Microsoft ၏ Focus Assist ကို ၂၀၁၈ ခုနှစ် Windows 10 update တွင် ပထမဆုံး မိတ်ဆက် ခဲ့ပါတယ်။
၎င်းဟာ Quiet Hours ဟု ခေါ်တဲ့ feature တစ်ခုကို အစား ထိုးခဲ့ပြီး Windows 11 က radical updates များကို မပေးသော်လည်း ၎င်းက feature ကို အသုံးပြုရ လွယ်ကူ စေမှာပဲ ဖြစ်ပါတယ်။
Focus assist ဟာ screen ပေါ်သို့ ပြန့်နှံ့ခြင်းကို ရပ်တန့်စေပြီး presentation mode တွင် display ပေါ်မှာ တင်၍ ၊ game ကစားနေတာ ( သို့မဟုတ် ) full-screen mode ဖြင့် app ကို သုံးနေစဉ် အလိုအလျောက် activate လုပ်နိုင်မှာပဲ ဖြစ်ပါတယ်။
ခဏလေး အတွင်း automatic sessions များကို edit ဘယ်လို လုပ်ရမလဲ ဆိုတာကို ဖော်ပြ ပေးထား ပါတယ်။ပထမဆုံး ဒီမှာ Focus assist ပိုင်းကို စတင် လုပ်ဆောင်ပုံ လုပ်ဆောင်နည်းကို ဖော်ပြ ပေးထားပါတယ်။
START A SESSION
Windows 11 တွင် Focus Assist က Clock app ၏ အစိတ်အပိုင်း တစ်ခု ဖြစ်လာ ပါတယ်။ Session တစ်ခုကို ကိုယ်တိုင် စတင်ဖို့ taskbar ၏ Search icon တွင် “Clock” ဟု ရိုက်ထည့်ပါ။ Session တစ်ခုကို ကြာရှည် စေလိုသော အချိန်ကို သတ်မှတ်ရန် ကူညီပေးတဲ့ page တစ်ခုကို လမ်းညွှန် ပေး ပါလိမ့်မယ်။ Daily goal တစ်ခု သတ်မှတ် ထားချင်ရင်လည်း သတ်မှတ် ထားနိုင် ပါတယ်။ Spotify account ကို focus sessions များသို့ link ချိတ်ခွင့်ပြုပေးသော ( သို့မဟုတ် ) ထို session အတွက် task တစ်ခုကို ရွေးဖို့ Microsoft To Do ကို သုံးတဲ့ tiles တွေ ရှိပါတယ်။ ဒီနှစ်ခုစလုံး မလိုဘူးဆိုရင် အောက်မှာ ဆက်ပြီး ဖော်ပြ ပေးထားပါတယ်။
Clock app ၏ ဘယ်ဘက် အောက်ခြေမှာ ရှိတဲ့ setting icon ကို နှိပ်လိုက်ရင် focus time ( breaks time အပါအ ၀ င် ) ကို ညှိနိုင်ပြီး focus period (သို့မဟုတ် break time ) ပြီးဆုံးတဲ့ အခါ ပြန်ပြီး လုပ်ဆောင်ဖို့ sound တစ်ခုကို ရွေးနိုင် ပါတယ်။ Spotify and / ( သို့မဟုတ် ) To Do tiles တွေကို ဖယ်ရှား နိုင်ပါတယ်။
Clock settings page ဟာ app အတွက် theme တစ်ခုကို ရွေးချယ် နိုင်ပြီး Focus assist session တစ်ခုတွင် ဘယ် notifications တွေကို filter မလုပ် သင့်ကြောင်း အပါအ၀င် notification settings ကို tweak လုပ်ခွင့် ပြုပါတယ်။
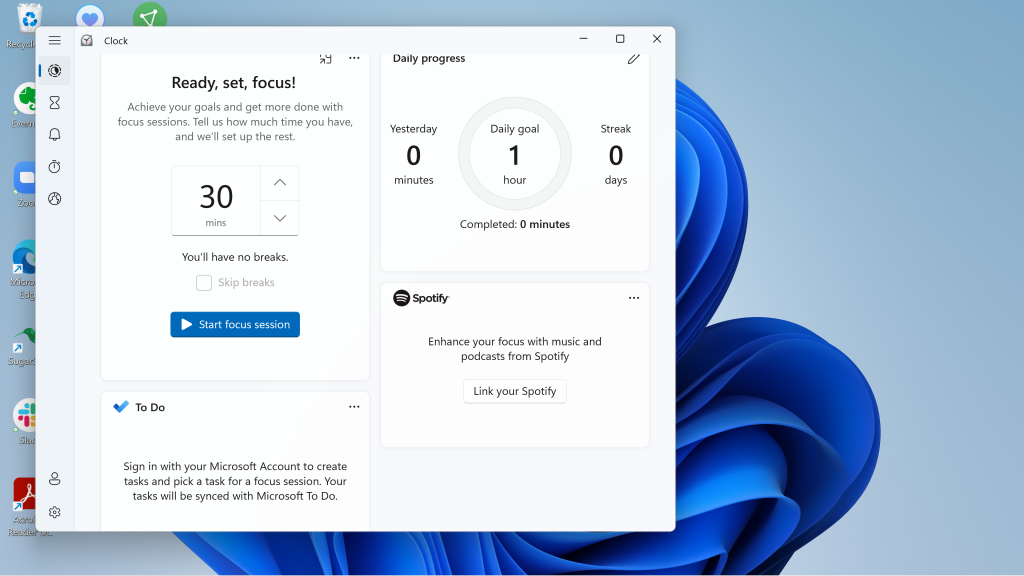
Now part of the Clock app, Focus assist lets you set goals for keeping on track.
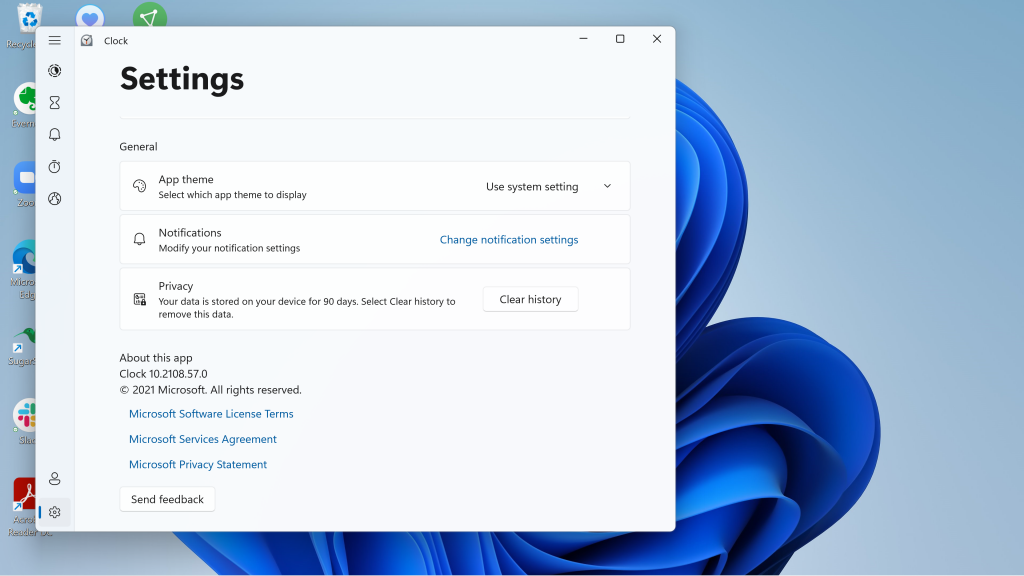
The Clock settings page lets you edit your notifications settings.
ဤ feature ကို အနည်းငယ် ပိုပြီး စိတ်ကြိုက် ပြင်ဆင်ပြီး automatic settings များကို edit လုပ်ဖို့ “Focus assist settings” ကို သွားဖို့ လိုအပ်ပါတယ်။
FOCUS ASSIST SETTINGS
Focus Assist setting ကို နည်းလမ်း များစွာဖြင့် ရရှိ နိုင် ပါတယ်။ “Settings” -> “System” -> “Focus assist,” ကို နှိပ်ပြီး ၊ “ Focus Assist” ကို ရှာဖို့ taskbar search icon ကို သုံးပြီး ဒါမှမဟုတ် taskbar ၏ ညာဘက် အစွန်းရှိ system clock ကို taskbar ၏ ညာဘက် အစွန်းရှိ system clock ကို နှိပ်ပြီး နောက် “ Focus assist settings” ကို နှိပ်ပါ။
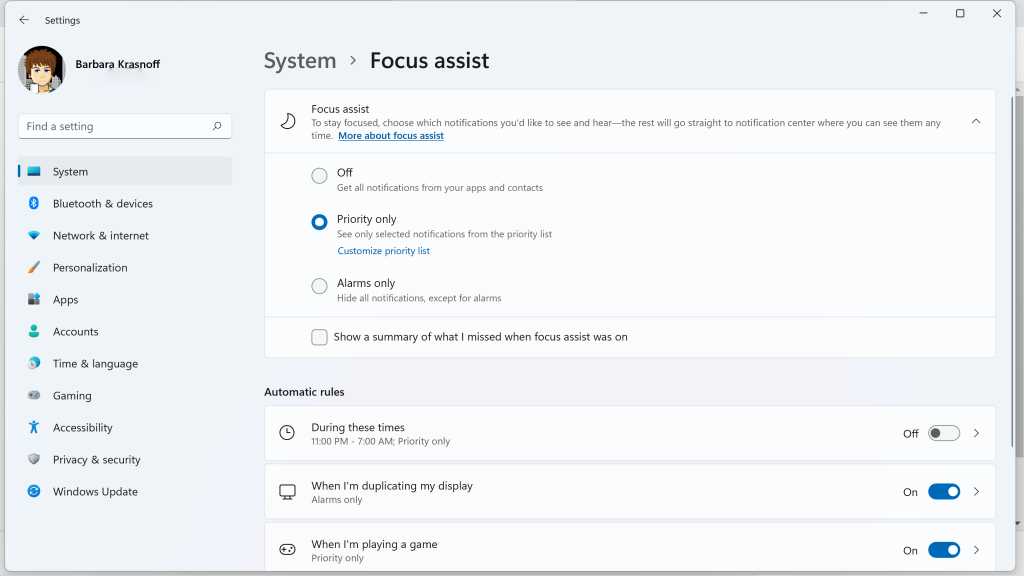
Within system settings, you can decide when you want Focus assist to activate, and for which notifications.
Focus Assist setting ရောက်ပြီးဆိုရင် main sections နှစ်ခု ရှိပါတယ်။ ပထမ section က Focus assist ကို အဖွင့် အပိတ် လုပ်နိုင်ပြီး ၎င်းက active ဖြစ်နေ ချိန်မှာ အချို့သော parameters များကို သတ်မှတ် နိုင်ပါတယ်။
- “Priority only” ဟာ priority list မှာ သတ်မှတ် ထားတဲ့ active ဖြစ်တဲ့ notifications တွေကို ကန့်သတ် ထားပါတယ်။ “Customize priority list” ခေါင်းစဉ်ခွဲ အောက်ရှိ “Priority only” ကို ရွေးချယ်ခြင်းဖြင့် ထို list ကို သတ်မှတ် နိုင်ပါတယ်။ ၎င်းဟာ incoming calls တွေ ကို အမြဲ သတိပေး နိုင်တာ ၊ reminders တွေကို အမြဲ အသိပေးတာ (သို့မဟုတ်) specific apps တွေမှ notifications များကို ခွင့်ပြု နိုင်တာတို့ ပါရှိ ပါတယ်။ Windows 11 အသစ်က taskbar မှာ ချိတ်ထားသော (သို့မဟုတ်) “Add contacts” button မှတဆင့် သတ်မှတ်သော contacts တွေမှ notifications တွေကို ဦးစားပေး ဆောင်ရွက် နိုင်စွမ်း ရှိပါတယ်။
- “ Alarms only” ဟာ သတ်မှတ်ထားသော alarms များမှ လွဲ၍ notifications အားလုံးကို ဖျောက်ထား နိုင်ပါတယ်။
- တစ်ခုခု လွဲချော်မှာကို စိုးရိမ်သလား? အကယ်၍ “Show a summary of what I missed when focus assist was on,” ကို check လုပ်ထားတယ် ဆိုလျှင် Focus assist မလုပ်ဆောင်တော့ပါက filter လုပ်ထားတဲ့ notifications တွေ အားလုံးကို အလိုအလျောက် အကြောင်းကြား ပါလိမ့်မယ်။
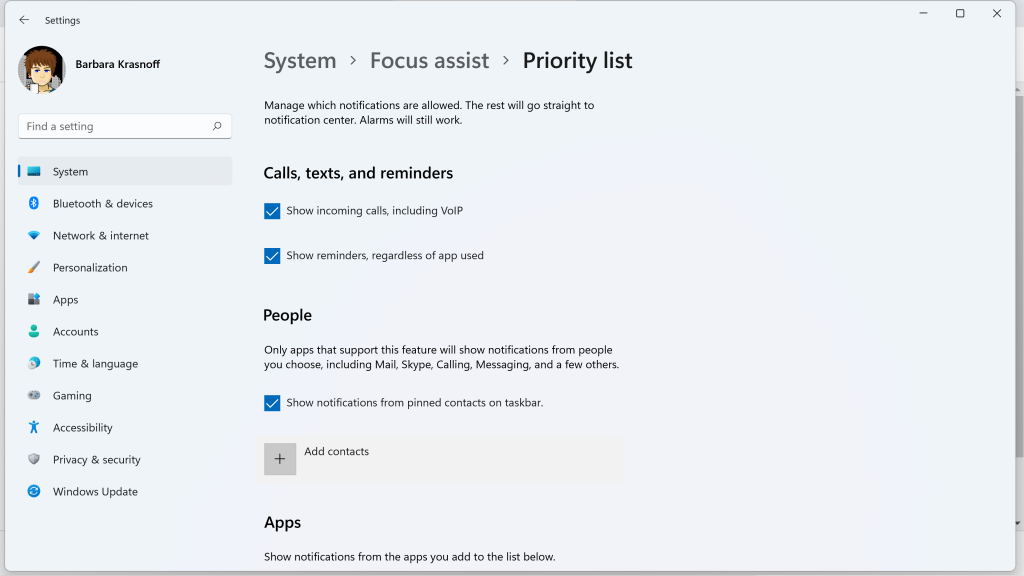
You can prioritize calls, reminders, apps, and specific contacts.
ဒုတိယ section က “Automatic rules,” ကို ဦးတည်ထားပြီး ကြိုတင် သတ်မှတ် ထားတဲ့ rules များစွာကို ညှိနိုင် ပါတယ်။ ဒီ page ကနေ တစ်ခုချင်းစီကို အဖွင့် အပိတ် လုပ်နိုင်ပေမယ့် သူတို့ရဲ့ setting တွေကို ပြောင်းချင်ရင်တော့ feature name ကို နှိပ်ပါ။
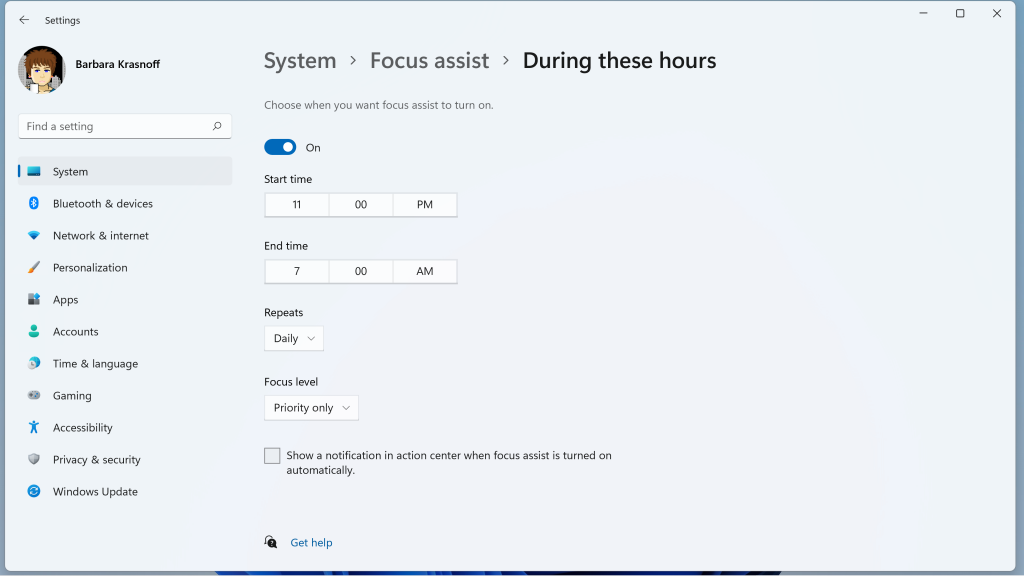
Decide when you want Focus assist to kick in automatically.
- “During these hours” တွင် Focus Assist စတင်မယ့် times နှင့် days များကို သတ်မှတ် ပေးနိုင် ပါတယ်။ Settings များကို edit လုပ်ရန် “During these times” ကို ရွေးပြီး နောက် နောက် page တွင် ၎င်းကို ပြောင်းပါ။Session တစ်ခုစီ အတွက် အစ နှင့် အဆုံး အချိန်များ ( start time and end time ) ကို ရွေးချယ် နိုင်ပါ လိမ့်မယ်။
“Automatic rules” အောက်မှာ ရှိတဲ့ အခြား features တွေဟာ တော်တော်များများ တူညီတဲ့ နည်းလမ်းတွေအတိုင်း လုပ်ဆောင် ပါတယ်။ Focus assist page တွင် ၎င်းတို့အား အဖွင့် အပိတ် လုပ်ရန် ခလုတ်ကို နှိပ်ပါ။ ၎င်းတို့ကို ညှိရန် သူတို့၏ name ကို နှိပ်ပါ။
- “When I’m duplicating my display” ဟာ display နှစ်ခု ရှိတဲ့အခါ ပေါ်လာ ပါတယ်။ ၎င်းကို priority only (သို့) alarms only ခွင့်ပြုရန် ၎င်းကို edit လုပ်နိုင် ပါတယ်။
- “When I’m playing a game” ဟာ တော်တော် သိသာ ပါတယ်။ ထပ်ပြီးတော့ priority only (သို့) alarms only ပြောင်းရန် ၎င်းကို နှိပ်ပါ။
- နောက်ဆုံးတွင် “When I’m using an app in full-screen mode only” ကို priority only (သို့) alarms only ပြောင်းလဲနိုင် ပါတယ်။
နောက်ဆုံး အရာ တစ်ခုကတော့ Focus assist ကို active လုပ်တဲ့အခါ taskbar ရဲ့ ညာဘက် အစွန်းမှာ small moon icon တစ်ခုကို မြင်ရပါလိမ့်မယ်။ ၎င်းကို နှိပ်ပြီး missed notifications တွေ အားလုံးကို မြင်နိုင် ပါတယ်။
Reference: The Verge
သတင်းဆောင်းပါးများ ဖတ်ရှုနိုင်ရန် နှင့်ရသစုံ ဗီဒီယိုများကို လက်မလွတ်တမ်း ကြည့်ရှုနိုင်ရန် Mitelar Facebook Page , Mitelar Website နှင့် Mitelar Youtube Channel တို့တွင် အသေးစိတ် ဝင်ရောက်လေ့လာကြည့်ရှုနိုင်ပြီး Like နဲ့ Followလေးလုပ်ထားဖို့လဲမမေ့ပါနဲနော်…။


