Apple Photos ၊ Google Photos နှင့် Facebook တို့တွင် မလိုအပ်သော ‘Memories’ ကို ဘယ်လိုပိတ်ရမလဲ ?
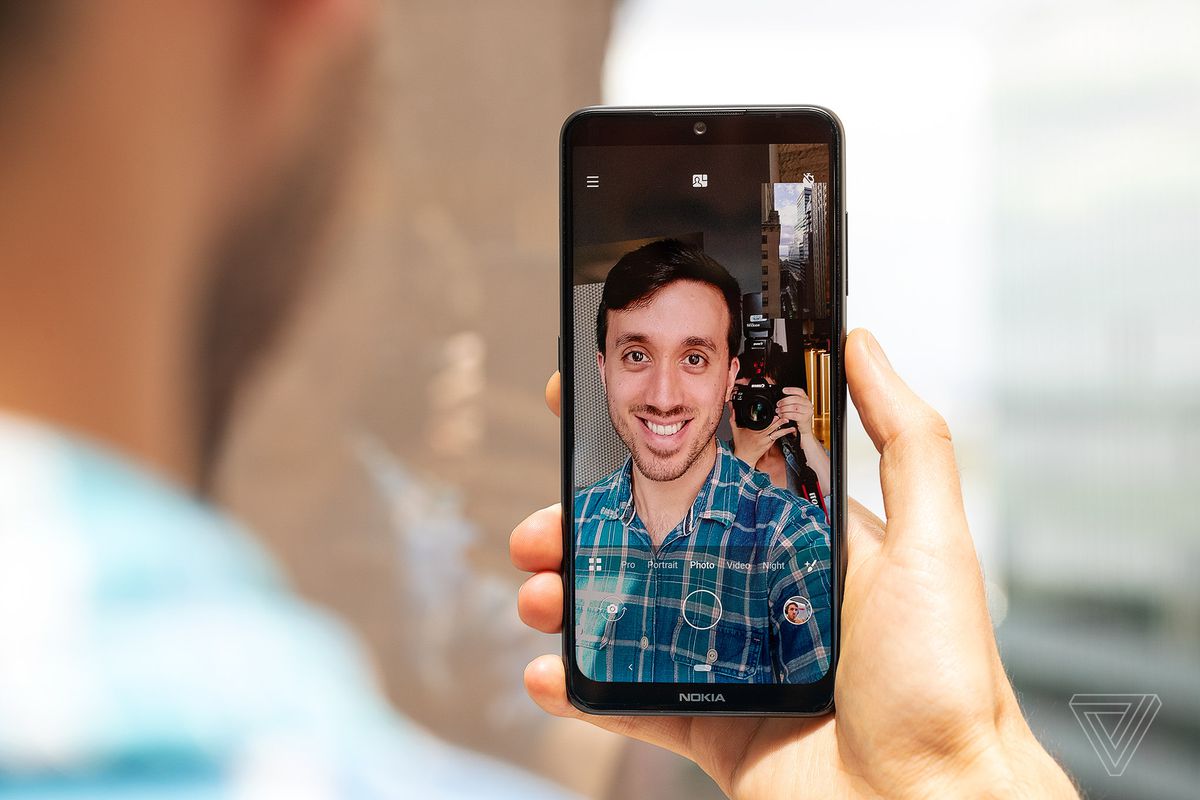
Apple ၊ Facebook နှင့် Google တို့က တည်ဆောက်ထားသော memory machines များဟာ ကျွန်ုပ်တို့ နှစ်သက်သော အချိန်များကို အမှတ်ရစေသော ဘယ်လို algorithm မျိုးကို မဆို subpar output ကို ပေးနိုင်ပါတယ်။ ကျွန်ုပ်တို့က ကျွန်ုပ်တို့ရဲ့ အကောင်းဆုံးဘ၀ကို ရှင်သန်နေသလို ခံစားခဲ့ရတဲ့ အဲဒီအချိန်တွေကို ပြန်အမှတ်ရနေမယ့်အစား သူတို့က ကျွန်ုပ်တို့ရဲ့ တည်ရှိမှု နိမ့်ကျတဲ့ miserable job ၊ rotten commute ၊ bad breakup တစ်ခု ဒါမှမဟုတ် ချစ်ရသူ တစ်ယောက် သေဆုံးခြင်းကို ခေါ်ဆိုနိုင်တယ်။
Apple Photos၊ Facebook နှင့် Google Photos တို့ဟာ သူတို့၏ “memories” features များဟာ တွန်းအားပေးနိုင်မည့် အရာများကို စီမံပေး ပါတယ်။သို့သော် pictures များနှင့် posts များကို algorithmically မြှင့်တင်ထားသော အရာများအား ထိန်းချုပ်ရန် ဤ settings များဟာ ရှာဖွေရန် မလွယ်ကူပါ။ အချို့ အခြေအနေများတွင် ဤ apps များက သတိပေးချက်တစ်ခုကို အသည်းအသန် တင်ပြခဲ့ ပါတယ်။
ဒီ apps တစ်ခုစီမှာ မြင်ရမယ့် memories တွေ၊ အနည်းဆုံး တစ်စိတ်တစ်ပိုင်းကို ဘယ်လို ထိန်းချုပ်မလဲဆိုတာ ဖော်ပြထားပါတယ်။
APPLE PHOTOS
iOS 14 ကို သုံးနေလျှင် Apple က ၎င်း၏ Memories feature ကို အကောင်အထည် ဖော်ခြင်းအားဖြင့် အခြား ကုမ္ပဏီနှစ်ခုမှ ကမ်းလှမ်းမှုများ နှင့် ယှဉ်လျှင် ထိန်းချုပ်မှုကို လျော့နည်းစေ ပါတယ် ။ ဒါပေမယ့် ဒီနှစ်နှောင်းပိုင်းမှာ iOS 15 ကို ပြောင်းလိုက်တာနဲ့ အဲဒါကို ပြောင်းလဲသင့်ပါတယ်။
IOS 14 DEVICE တစ်ခုမှာ ဘယ်လိုပိတ်မလဲ ?
- Photos များဟာ ရှောင်ရှားလိုသော memory ဖြင့် တင်ပြပါက video (သို့) photo ကို ကြာကြာနှိပ်ပြီးနောက် photo အောက်ရှိ “Suggest Fewer Memories Like This” button ကို နှိပ်ပြီးနောက် iOS 14 က ၎င်း၏ Memories feature မှ လူအချို့ ( သို့မဟုတ် ) ရက်စွဲများကို ဖယ်ထုတ်ရန် ရွေးချယ်စရာများ မပါသောကြောင့် အကောင်းဆုံးကို မျှော်လင့်ပါ။
- Screen ၏ အောက်ခြေတွင် တွေ့ရသော Photos များ၏ “For You” section ကိုလည်း သွားနိုင်ပါတယ်။ ရှောင်လိုသော photo (သို့) video ကို ရှာပြီး တူညီသော menu ကို ရယူရန် ၎င်းကို ကြာကြာ နှိပ်ထားပါ။
- Memories အသစ်များအား notification တတ်ခြင်းမှ ရပ်တန့်ရန် Settings app ကို ဖွင့်ပါ။ “Notifications” -> “Photos” -> “Memories” နှင့် “Allow Notifications.” ကို ပိတ်ထားပါ။
- iPhone ၏ homescreen ပေါ်မှာ Photos widget ကို ထည့်ခဲ့လျှင် Featured Photos memory collection မှ pictures များဟာလည်း ထိုနေရာတွင် ပေါ်လာနိုင် ပါတယ်။ ထို list မှ တစ်ခုကို ဖယ်ရှားရန် menu တစ်ခု မပေါ်မချင်း ၎င်းကို ဖိထားပါ၊ ထို့နောက် အောက်သို့ ဆွဲချပြီး “ Featured Photos from Remove” ကို နှိပ်ပါ ။
IOS 15 DEVICE တစ်ခုမှာ ဘယ်လိုပိတ်မလဲ ?
လာမည့် iOS 15 operating system က Memories တွင် မကြာခဏ particular person တစ်ဦး ကို ဖော်ပြရန် (သို့) ထို particular person ကို လုံးဝဖျက်ပစ်ရန် option တစ်ခု ထပ်တိုး ထားပါတယ်။
- Photos app တွင် screen အောက်ခြေရှိ Albums icon ကို နှိပ်ပါ ၊ ထို့နောက် People ( “People & Places ” အောက်ရှိ ) ကို နှိပ်ပါ။ ပြောင်းလဲချင်သော person ၏ Memories များကို ရွေးပါ။
- ညာဘက်ထိပ်ရှိ အစက်သုံးစက် ( three dots )ကို နှိပ်ပါ။ အခြားအရာများအကြားတွင် ၎င်းအား “Feature This Person Less,” (သို့မဟုတ် ) “Remove This Person from People,” ဆိုတဲ့ pop-up menu တစ်ခုကို ရရှိပါလိမ့်မယ်။
- “Feature This Person Less,” ကို နှိပ်လိုက်ရင် ရွေးချယ်စရာ နှစ်ခု ရရှိပါလိမ့်မယ်။ “ Feature This Person Less “ (သို့) “ Never Feature This Person “ ဆိုတဲ့ ရွေးချယ်စရာတို့ကို ရရှိပါလိမ့်မယ်။
- “Remove This Person from People,” ကို နှိပ်ပါက iCloud-connected devices အားလုံးမှ names များနှင့် favorites များ အားလုံးကို ရှင်းပစ်မည့် people album ကို reset လုပ်ရန် ဖိတ်ခေါ် လိမ့်မယ်။
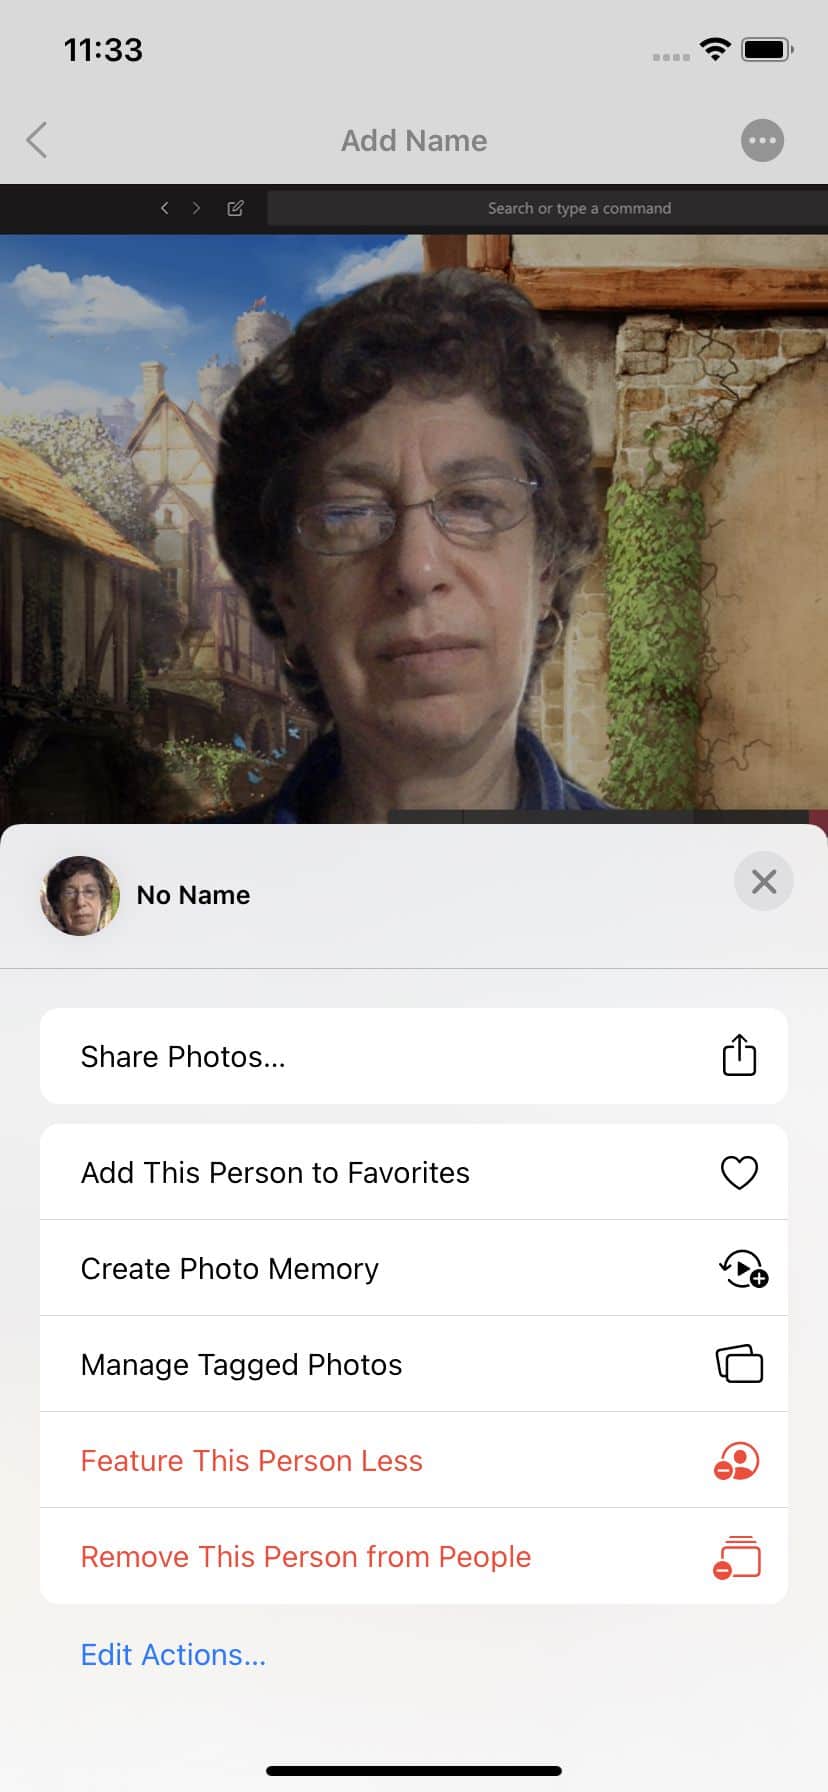
iOS 15 will offer more say over your Memories.
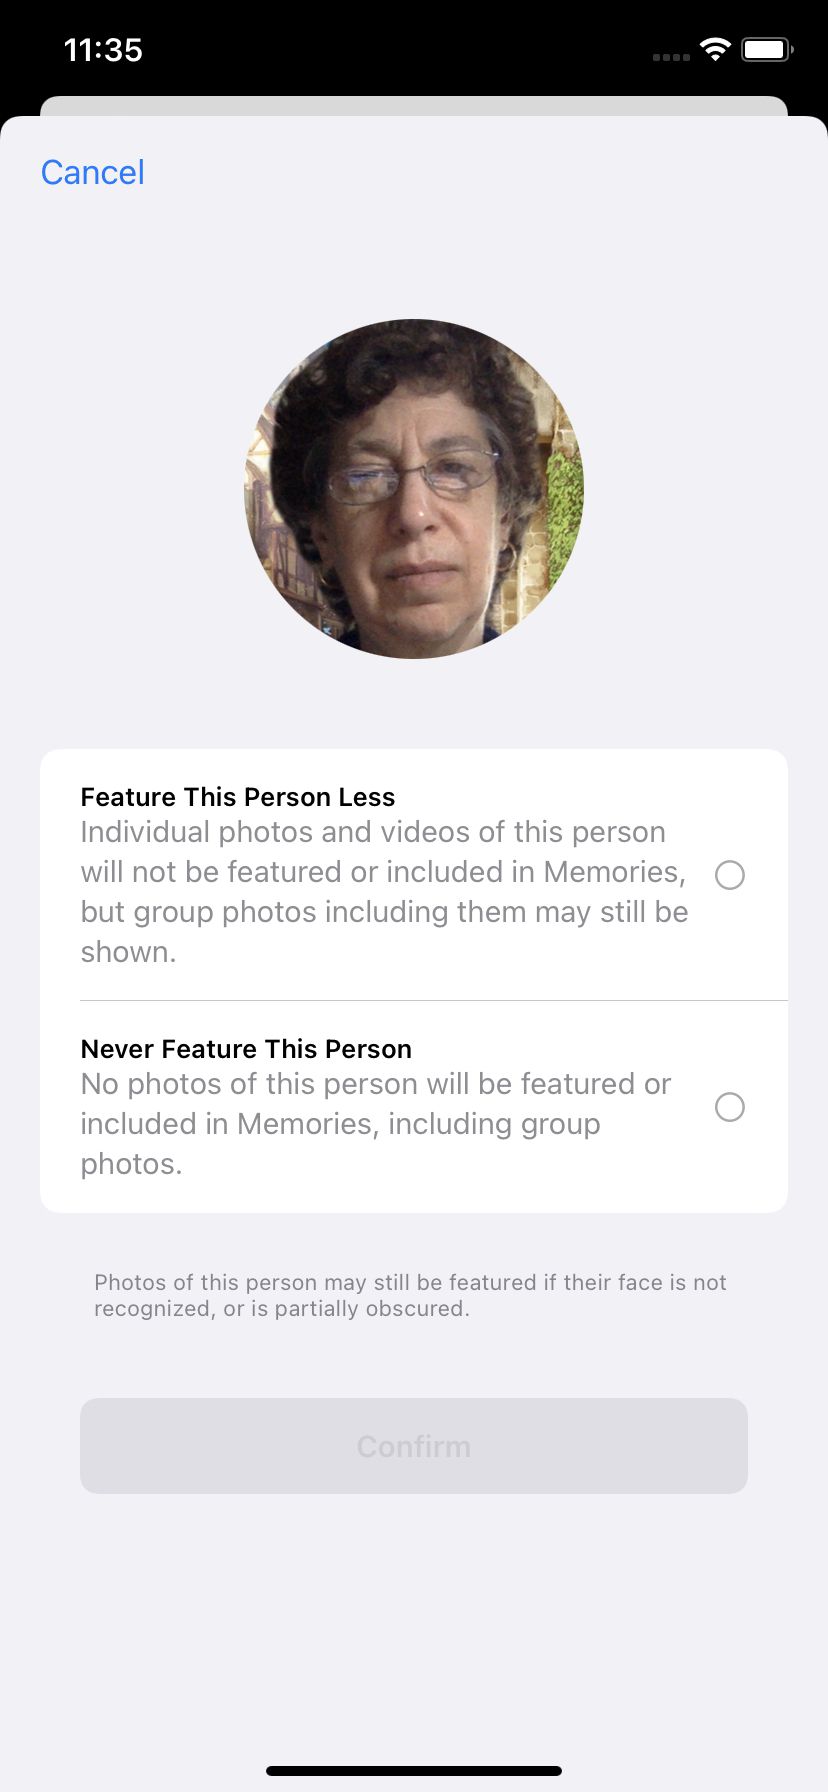
You can feature a person less or never feature them again.
MAC မှာ ဘယ်လိုပိတ်မလဲ ?
- Photo ပေါ်တွင် Right-click နှိပ်၍ သတိပေးချက်များ ပိုရရန် “Suggest Fewer Memories Like This” ကို ရွေးချယ်ပါ။
- Memories အသစ်များအား notifications မှ operating system ပိတ်ရန် screen ၏ ဘယ်ဘက် အပေါ်ထောင့်ရှိ Photos menu သို့ သွားပြီး “Preferences…” ကို ရွေးပါ၊ “General” tab အောက်ရှိတဲ့ “Show Memories Notification” ဘေးရှိ box ကို အမှန်ခြစ် ဖြုတ် ( uncheck လုပ်)ပါ။ holiday photos များဟာ အထူးစိတ်အနှောင့်အယှက်ဖြစ်လျှင် “ Show Holiday Events” ကို အမှန်ခြစ်ဖြုတ်( uncheck လုပ်) နိုင်ပါတယ်။
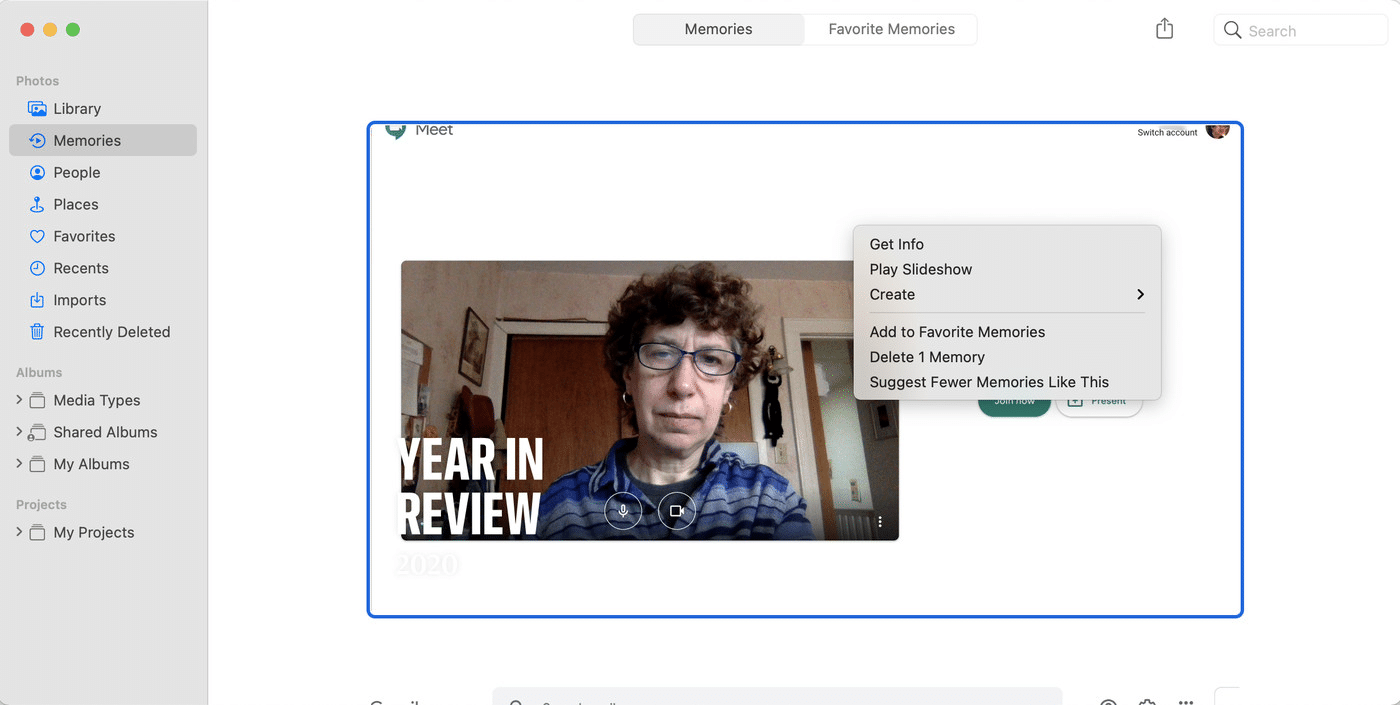
Right-click on a photo to suggest that it no longer appear in your Memories.
Social network ဟာ ၂၀၁၅ ခုနှစ်တွင် ဤ nostalgia အား “On This Day” အဖြစ် ဖြန့်ချိပြီးနောက် people (သို့) dates များကို filter လုပ်နိုင်စွမ်းကို ထည့်ဖို့ လအနည်းငယ် ကြာခဲ့သည်။ ထို tool ကို အဲ့အချိန်မှစ၍ တည်ဆောက်ခဲ့ပြီး ယခုအခါ Memories ဟု ခေါ်ပါတယ်။ Preferences တွေကို ပြောင်းလဲဖို့ web app ဒါမှမဟုတ် mobile app ကို သုံးနိုင်ပါတယ်။
WEB APP
- ဘယ်ဘက် column ရှိ “Memories” ကို ရွေးပါ။ ( ၎င်းကို ရှာဖို့ “See More” ကို နှိပ်ပါ။ )
- ဘယ်ဘက်ရှိ “ Hide People ” ( သို့မဟုတ် ) “ Hide Dates ” ကို နှိပ်ပါ။
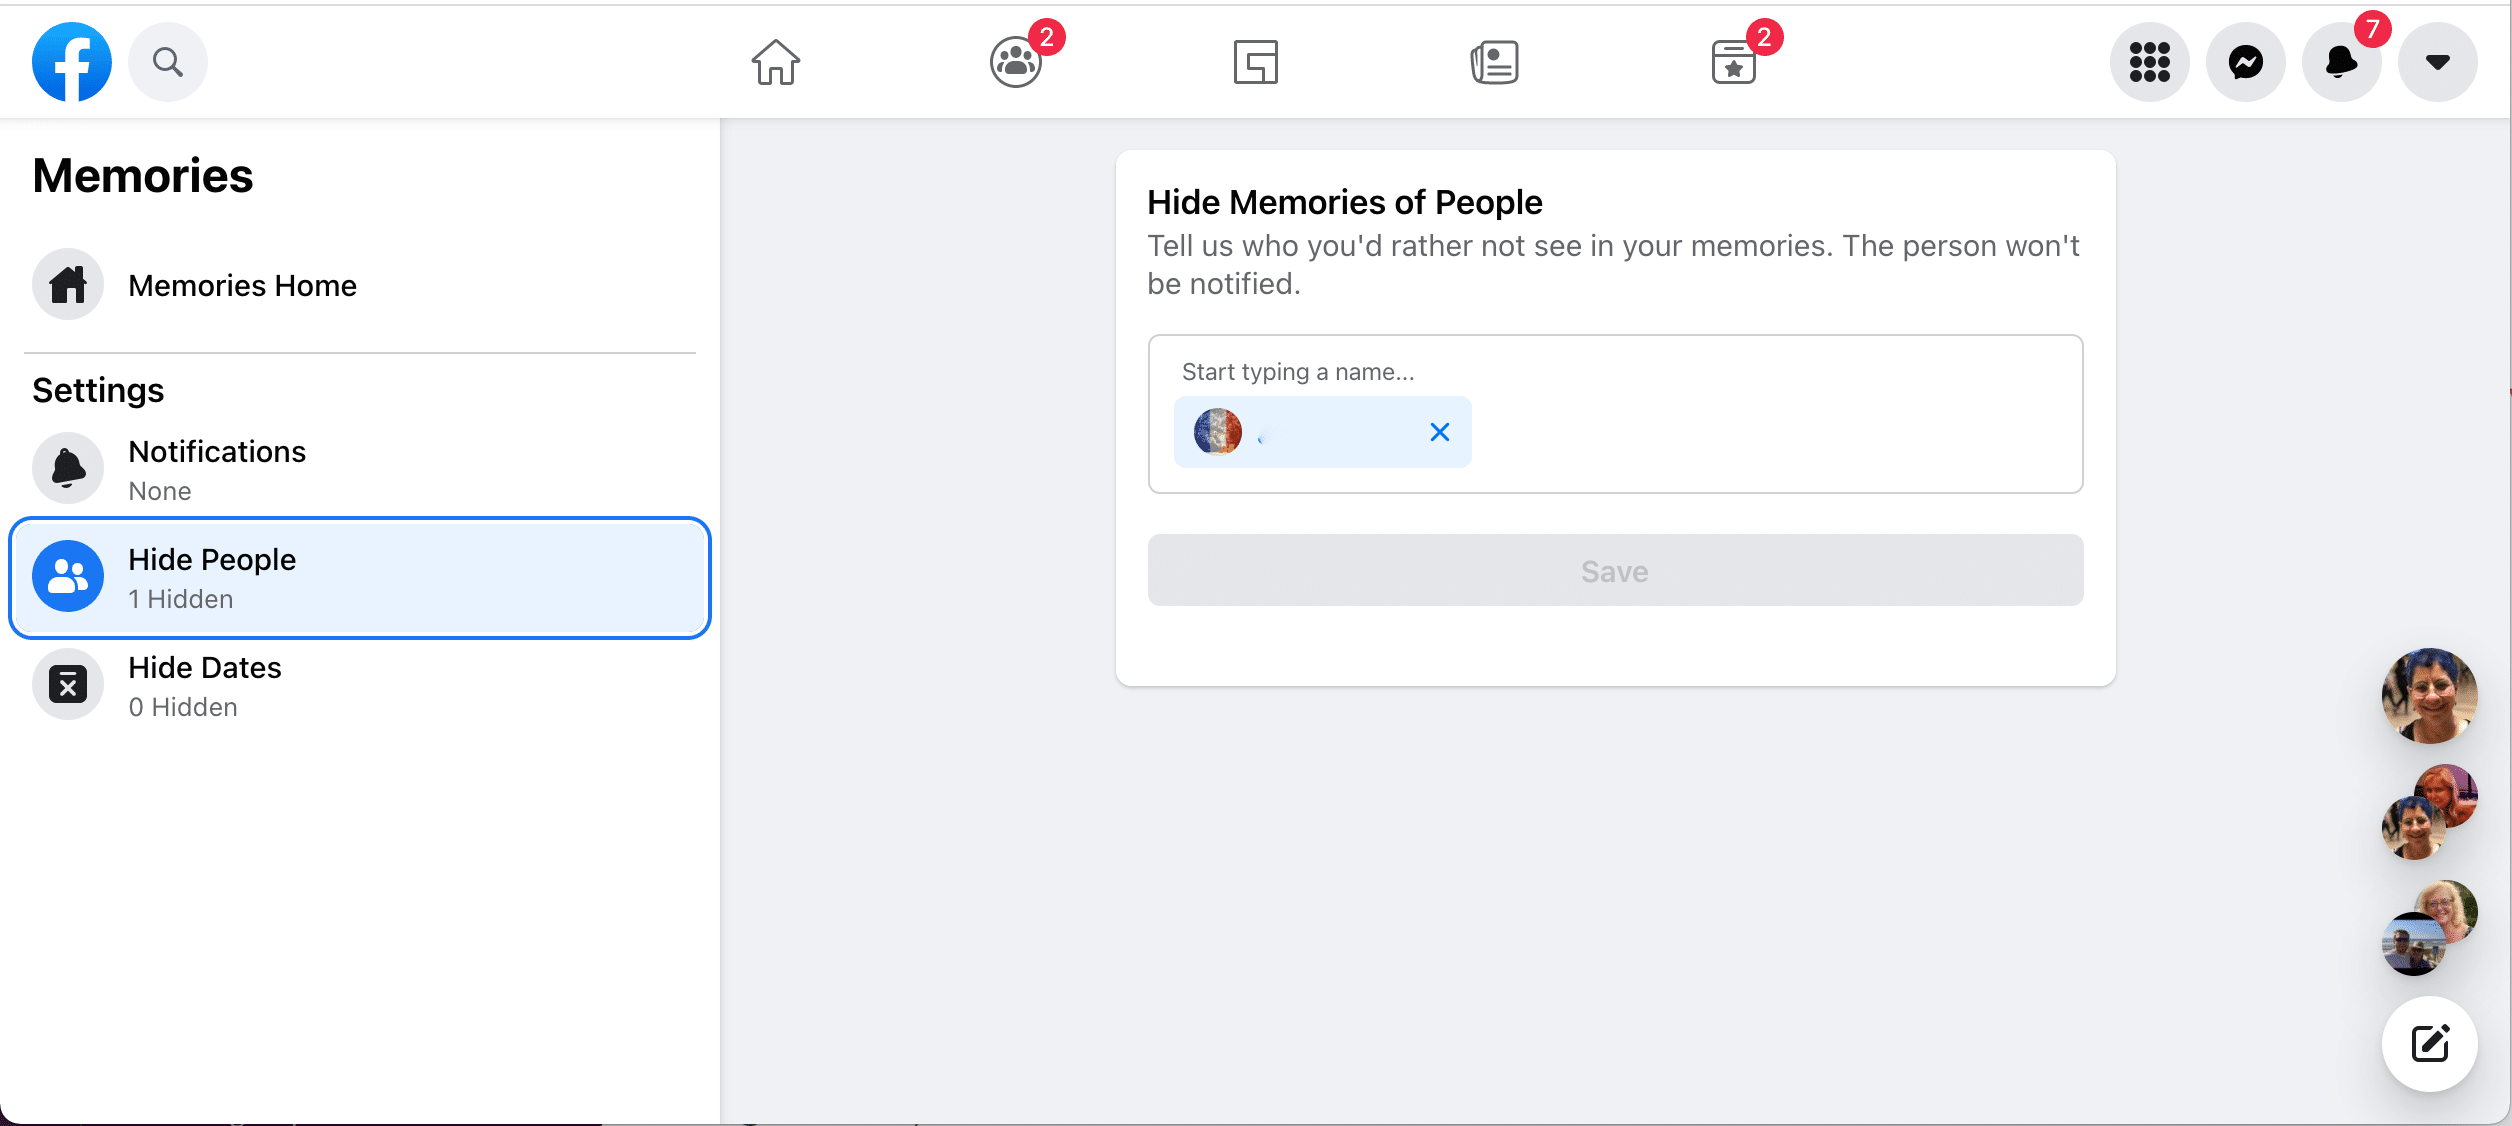
Facebook’s web app lets you hide specific people from your Memories notifications.
MOBILE APP
- Android မှာဆိုရင် ညာဘက် top မှာ (သို့) iOS မှာဆိုရင် ညာဘက် bottom ရှိ menu icon ကို နှိပ်ပါ။
- “Memories” ကို နှိပ်ပြီးနောက် gear icon ကို နှိပ်ပါ။
- “ Hide Memories” အောက်တွင် ကြည့်ပြီး “ People” (သို့မဟုတ်) “ Dates” ကို ရွေးပါ။
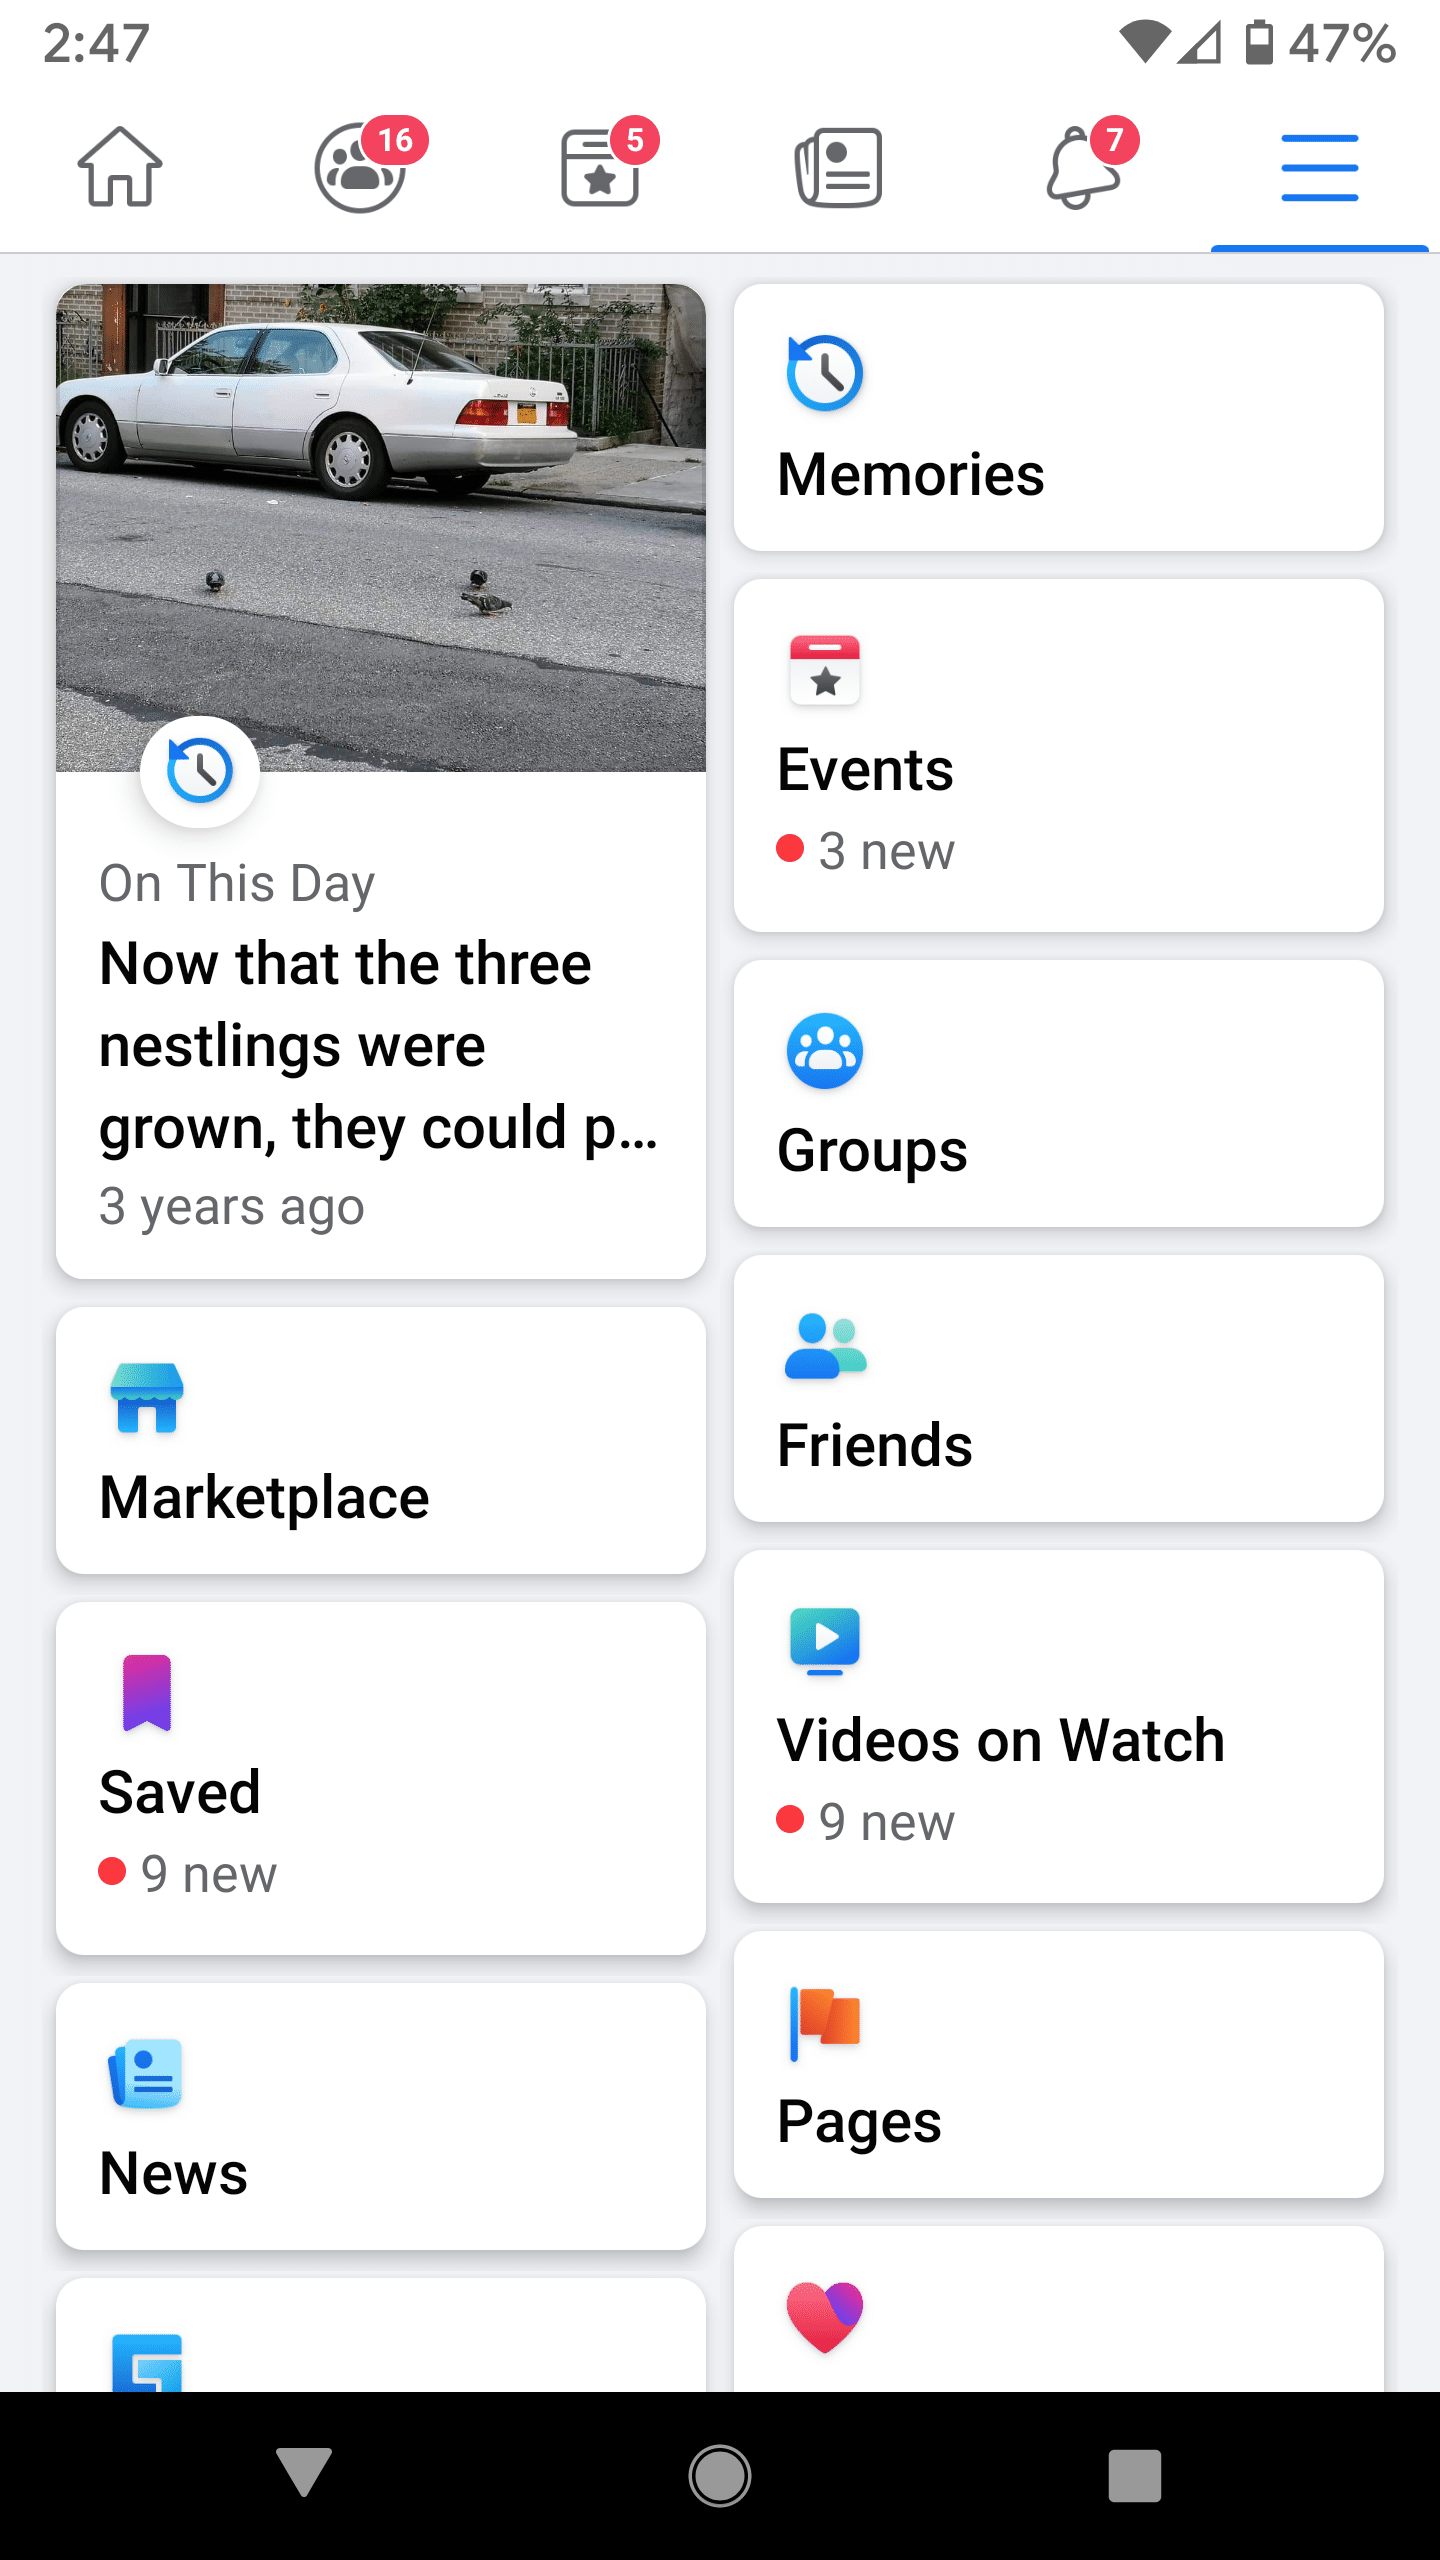
You’ll find Memories in the menu after tapping the three parallel lines.
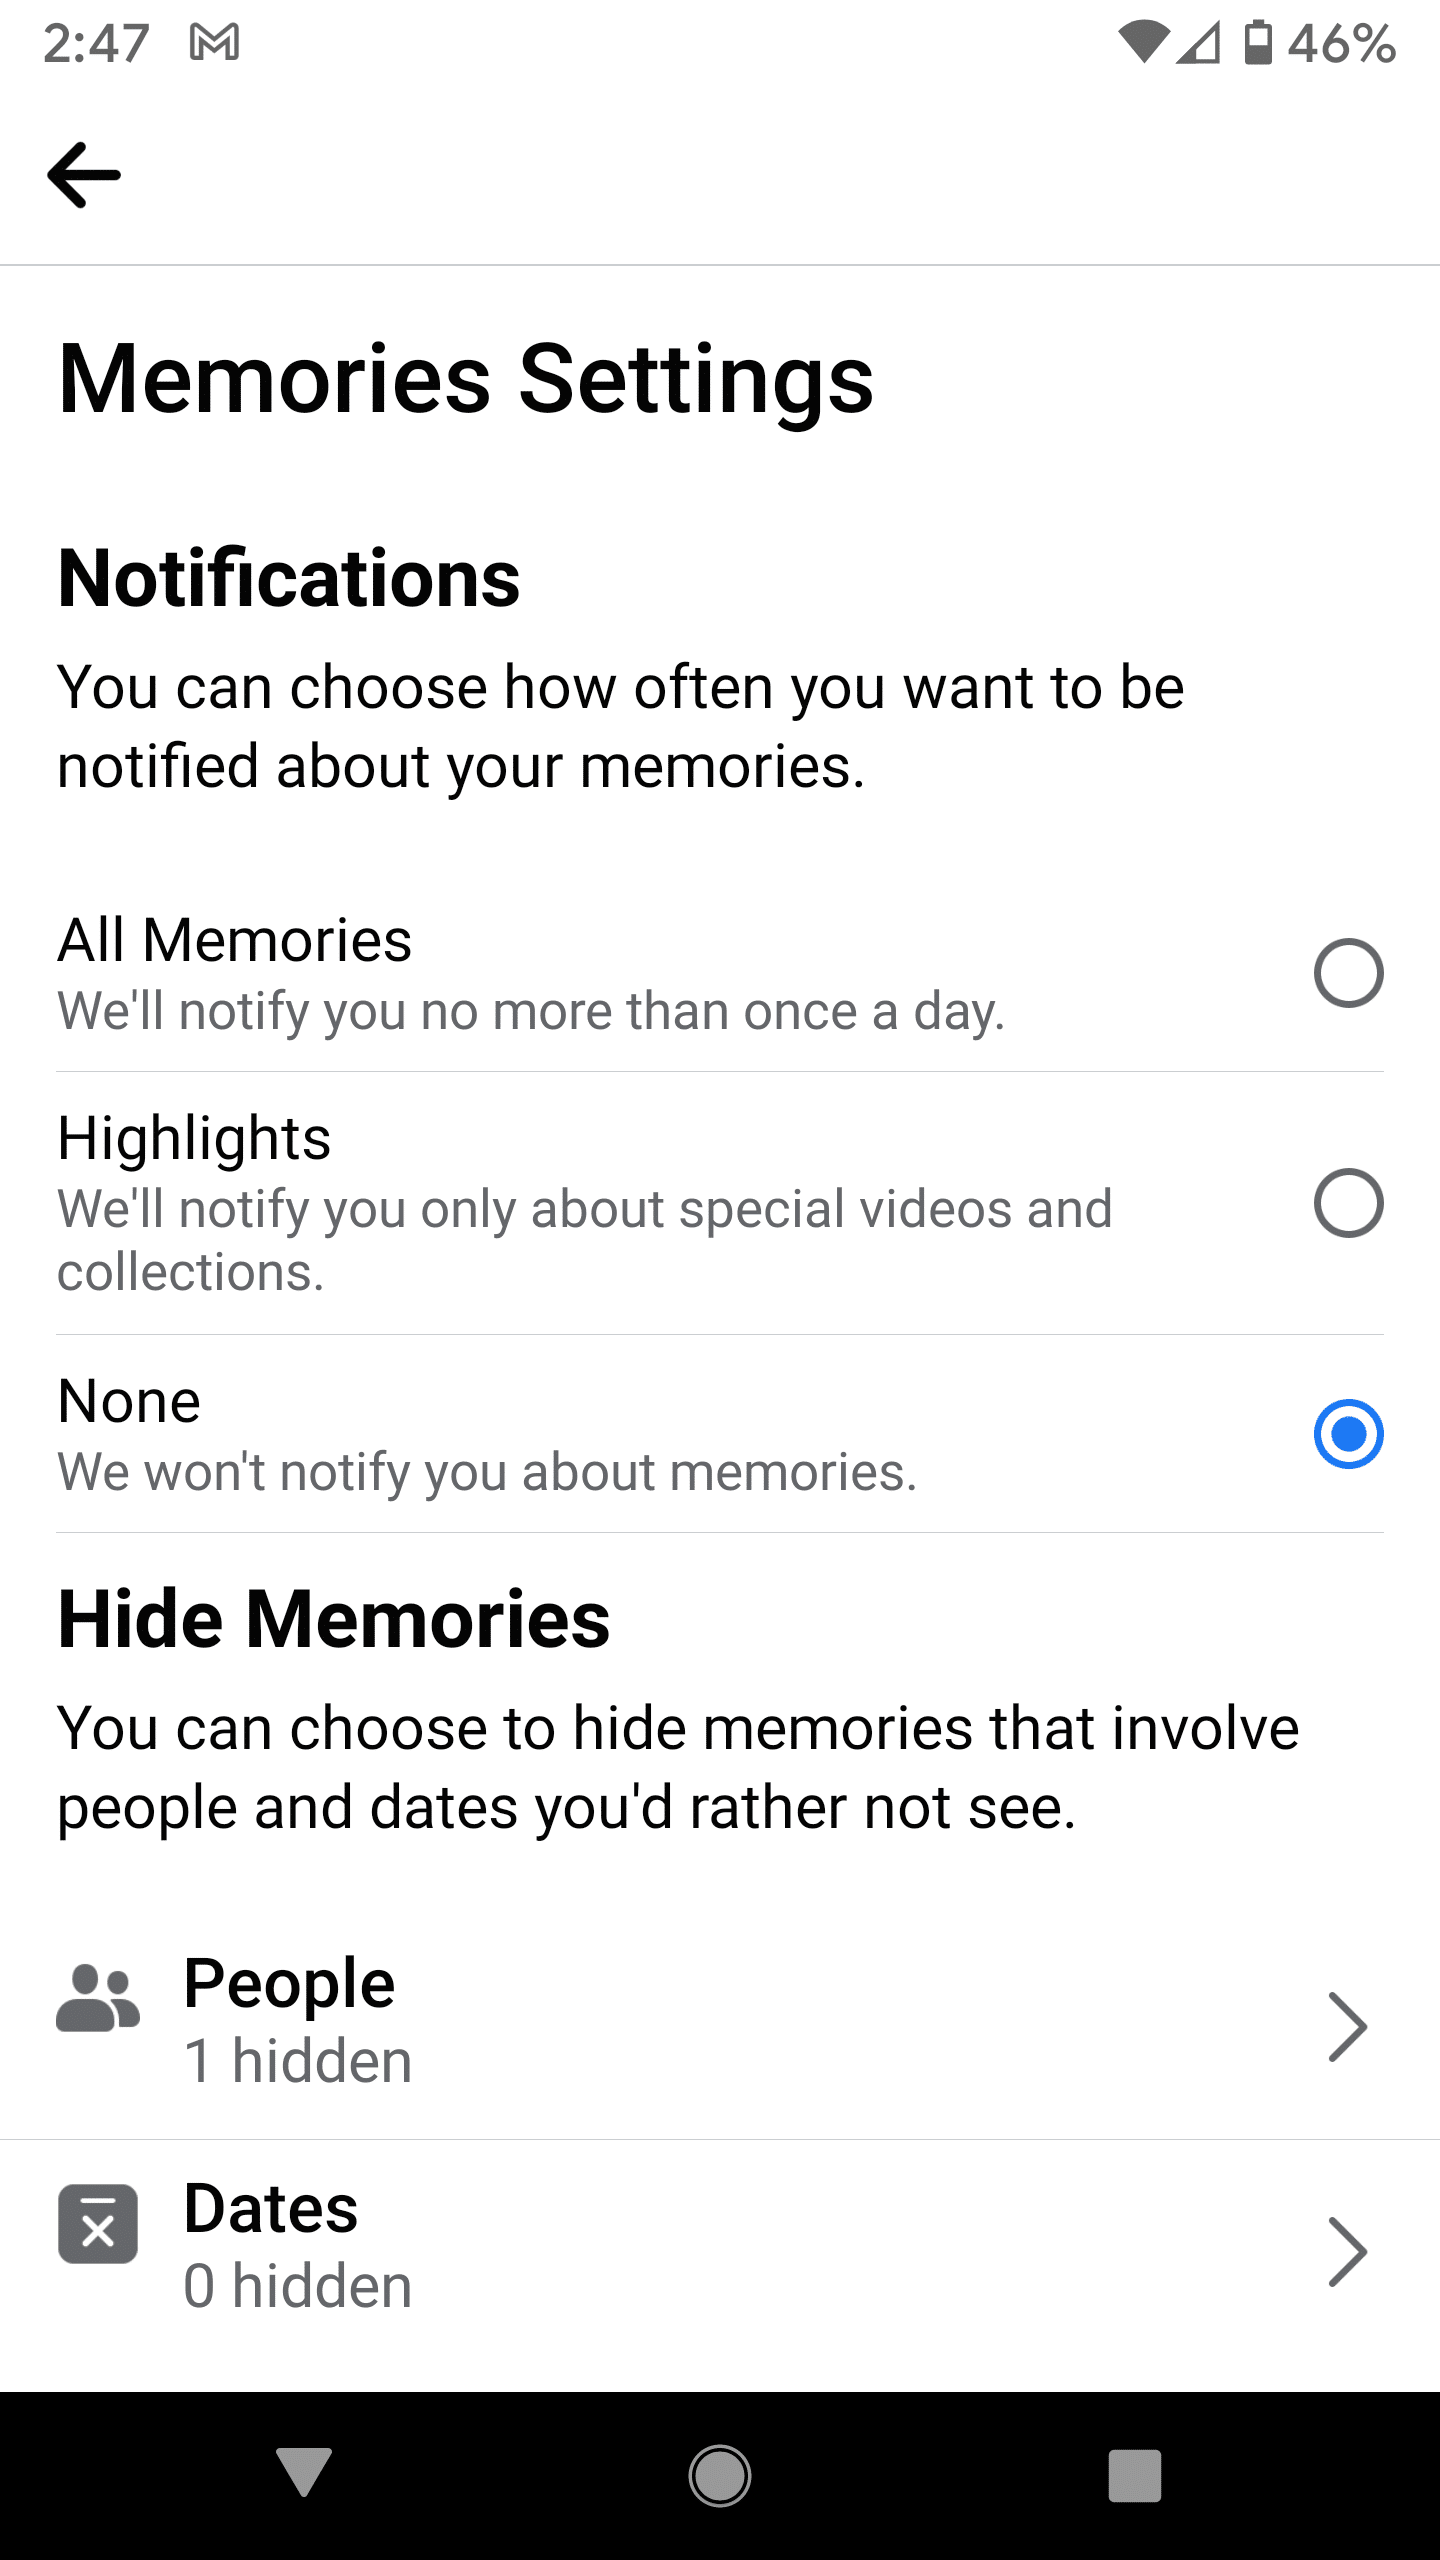
Besides hiding people or dates, you can choose how often to be notified about Memories.
Mobile device (သို့) desktop ပေါ်မှာပဲ ဖြစ်ဖြစ် ၊ Memories မှာ မလိုချင်တဲ့ လူတွေရဲ့ နာမည်တွေ ၊ ဒါမှမဟုတ် ဖယ်ထုတ်ချင်တဲ့ နေ့စွဲတွေကို အခုပဲ ရိုက်နိုင်ပါပြီ။ နာမည်တစ်ခု ရိုက်လိုက်တဲ့ အချိန် သတိထားပါ ၊ friends တွေရဲ့ နာမည်တွေ မရခင်မှာ တခါတလေကျရင် random ဖြစ်ပြီး သူစိမ်းတွေရဲ့ public pages တွေ ၊ profile တွေ ရနိုင်ပါတယ်။
Facebook ကို feature request တစ်ခု တောင်းဆိုဖို့ အကြောင်းအရာတစ်ခု ရှိပါတယ်။အဲ့ဒါ Tagged လုပ်ထားတဲ့ အခြားလူတွေရဲ့ posts တွေကို Memories များမှ ဖယ်မထုတ်နိုင်သေးတဲ့ အချက်ပဲ ဖြစ်ပါတယ်။
Memories settings screen များကလည်း Facebook က တစ်ရက်လျှင် အများဆုံး တစ်ကြိမ် ၊ algorithmically ရွေးချယ်ထားသော highlights များ၊ သို့မဟုတ် None ဆိုတဲ့ options တွေ ပါရှိတဲ့ အတွက် Memories အသစ်များ မကြာခဏ notification တတ်တာကို ထိန်းညှိပေး နိုင်ပါတယ်။
GOOGLE PHOTOS
Memories feature ဟာ Google တွင် 2019 မှာ Google Photos သို့ ထည့်ထားသော people (and pets) ဒါမှမဟုတ် ၎င်း၏ mobile apps များတွင် ပူဆွေးစရာ ဖြစ်စေသော အတိတ်က ဖြစ်ရပ်များကို notifications တတ်ခြင်းမှ hide လုပ်ရန် options များကို ပေးပါတယ်။ Photos web app က screen သို့ notifications များကို မပို့သောကြောင့် ထို settings များကို ထည့်မပေးပါဘူး။
- mobile Google Photos app တွင် ညာဘက်ထိပ်ရှိ account-profile picture ကို နှိပ်ပါ။
- Android မှာဆိုရင် “Photos settings” (သို့မဟုတ်) Apple devices မှာဆိုရင် “Google Photos Settings”ကို နှိပ်ပါ။
- “Memories.” ကို နှိပ်ပါ။
- ဤ flashbacks များထဲမှ တစ်ခုကို ဖယ်ရှားရန် “Hide people & pets” ကို နှိပ်ပါ။ Google Photos က အလိုအလျောက် အသိအမှတ်ပြုပြီး အမျိုးအစား ခွဲခြားထားတဲ့ faces များမှာ နာမည်တွေထည့်ပြီးပြီဆိုရင် ဒါက ပိုလွယ်လိမ့်မယ်။ Google Photos က တစ်စုံတစ်ဦး၏ picture ကို လွဲချော်ပါက ၎င်းကို strange angle တစ်ခု (သို့မဟုတ်) poor light တွင် ရိုက်ခဲ့လျှင် ၎င်းဟာ Memories တွင် ပြန်လည် ပေါ်ထွက်လာ နိုင်ပါတယ်။
- “Memories” page ရှိ “Hide dates” tool ဟာလည်း အလွန် ရိုးရှင်းပါတယ်။ “ Hide Dates” ကို နှိပ်ပြီး သွားလိုသောနေ့ (သို့) နေ့ရက်များကို ရွေးချယ်ပါ။
Google Photos က Memories အချို့ (သို့) အားလုံးအကြောင်း notifications တတ်တာကို ရပ်တန့်ရန်
- Memories page ရှိ “Notifications” link ကို နှိပ်ပါ။
- နောက် page တွင် “Memories” section ကို ရှာပါ။ ဤနေရာတွင် Google Photos ရှိနေခြင်းဟာ ယခင်နှစ်များ (previous years ) က ယနေ့ memories များ (သို့မဟုတ်) “Themed memories” အကြောင်း ရှောင်ဖယ်နိုင်ပါတယ်။
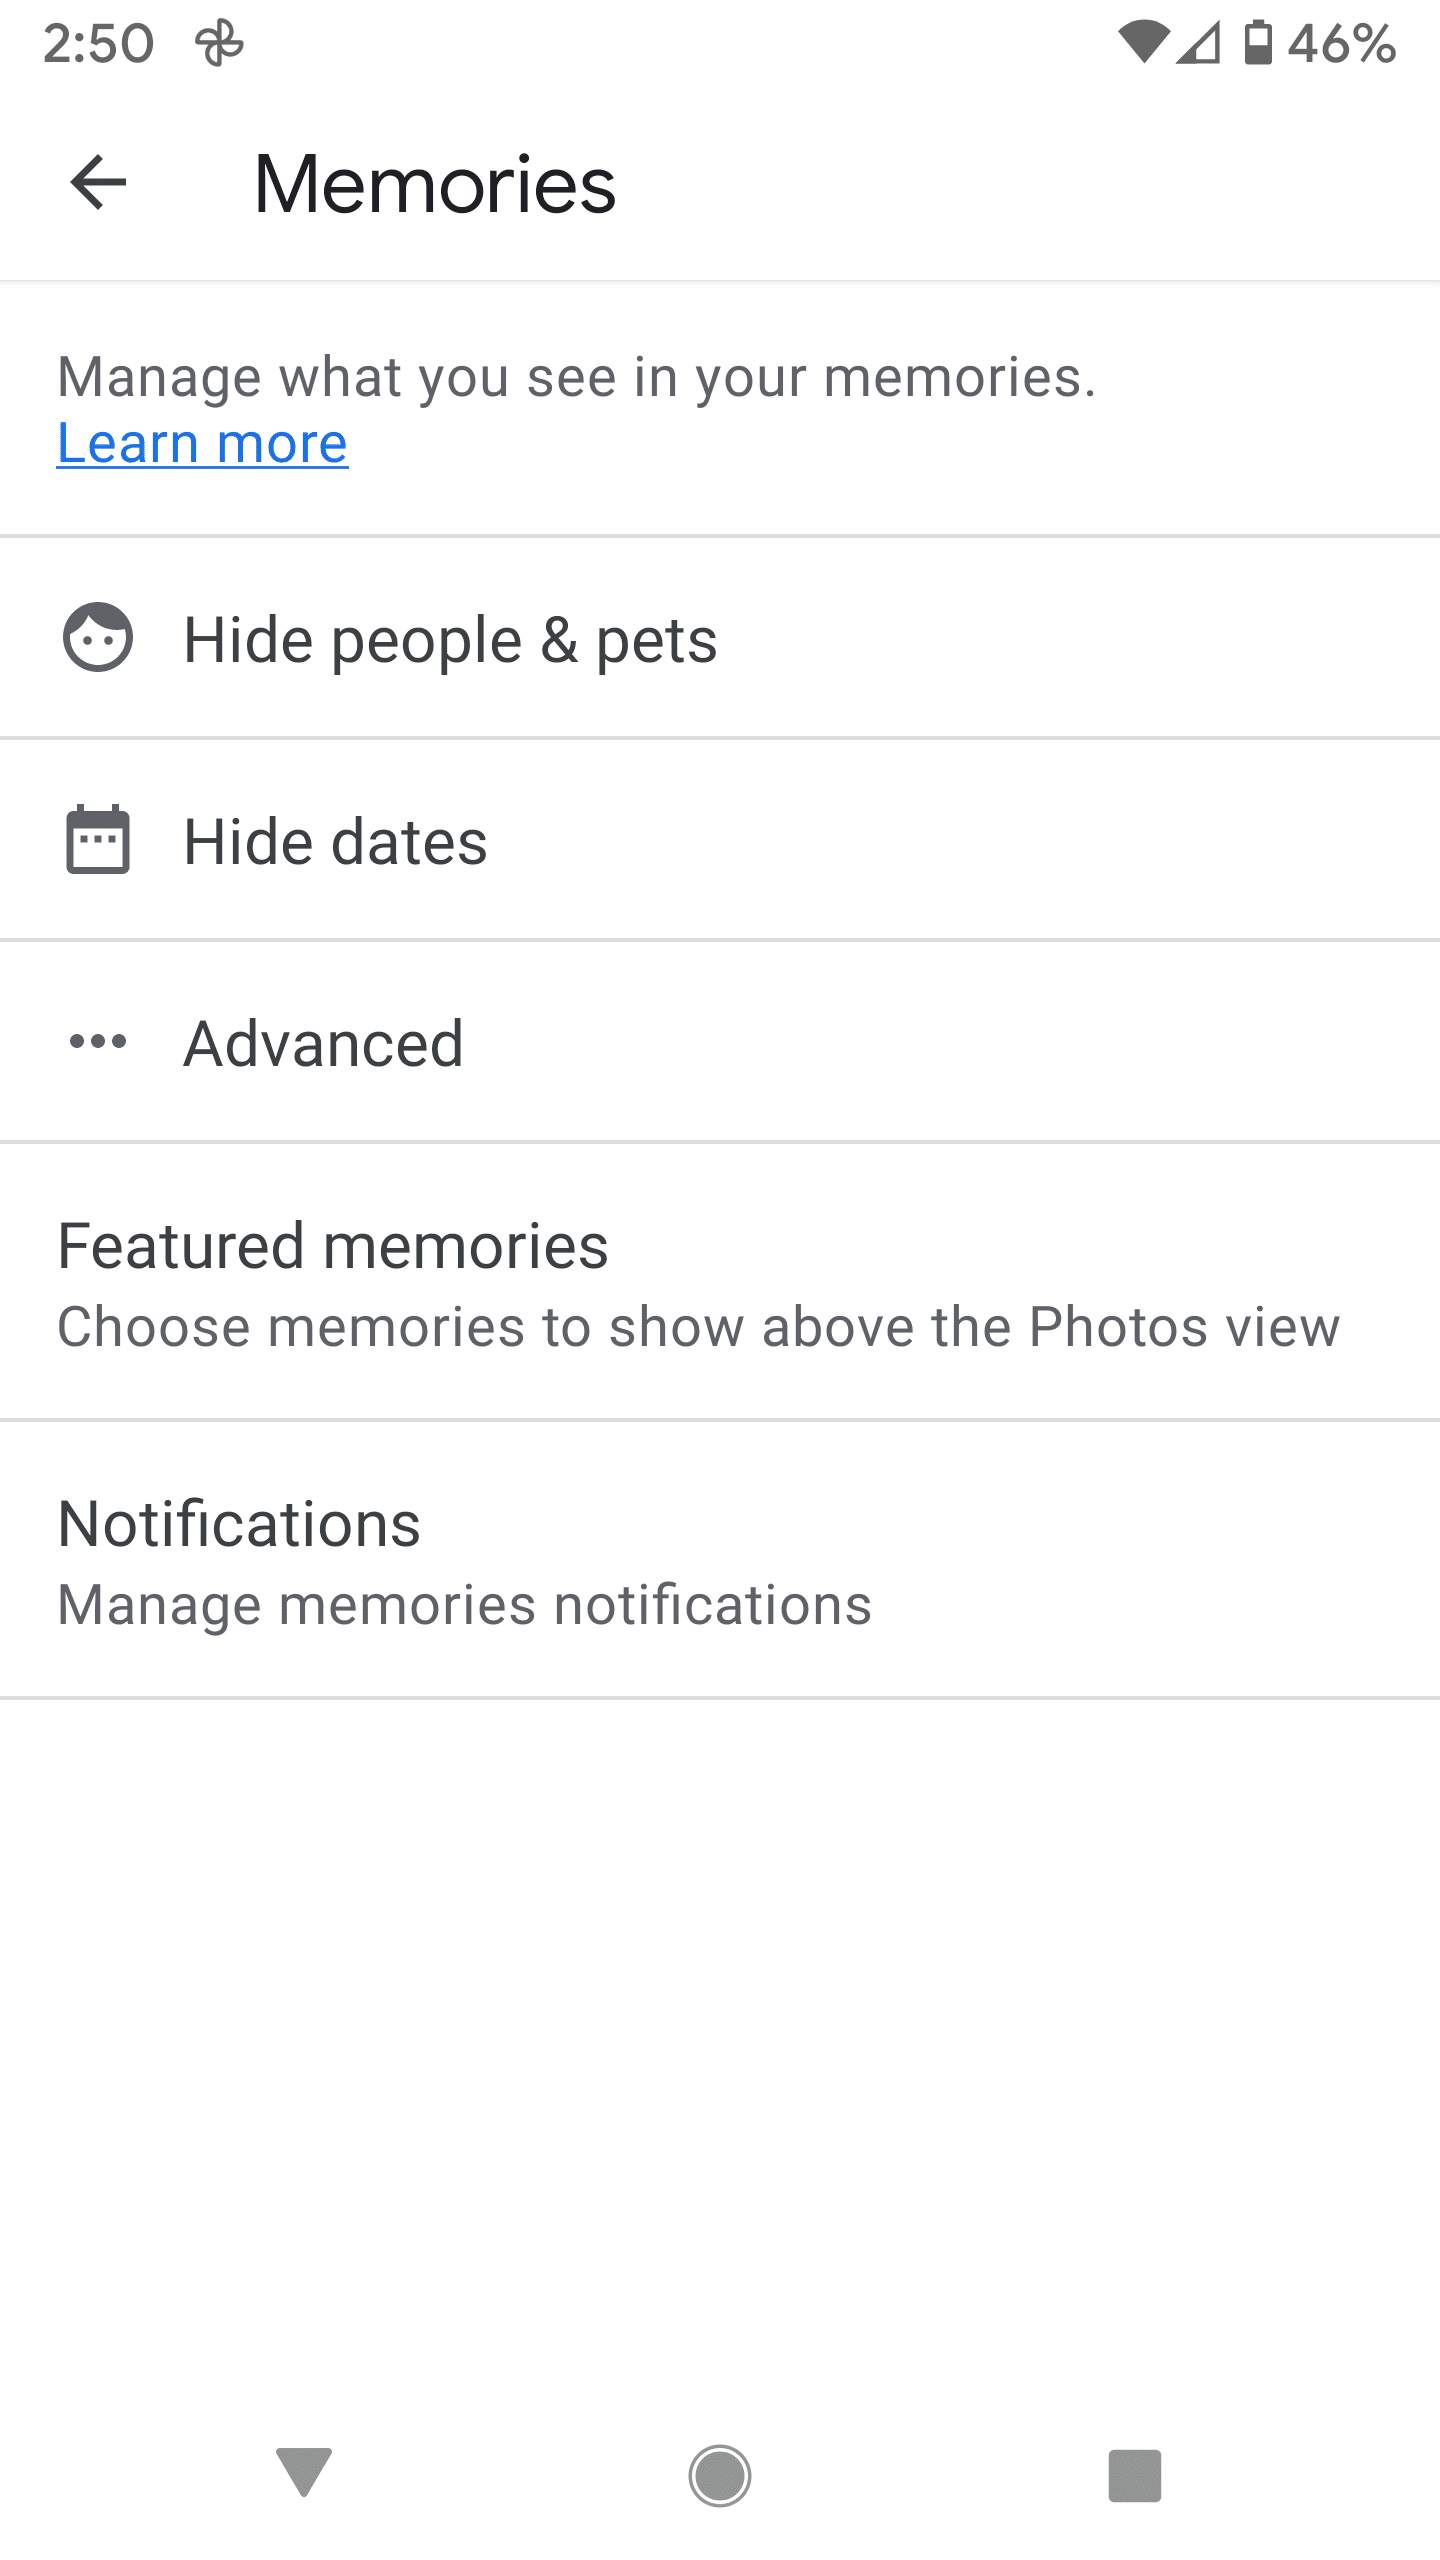
Google Photos’ Memories page lets you hide people, pets, or dates.
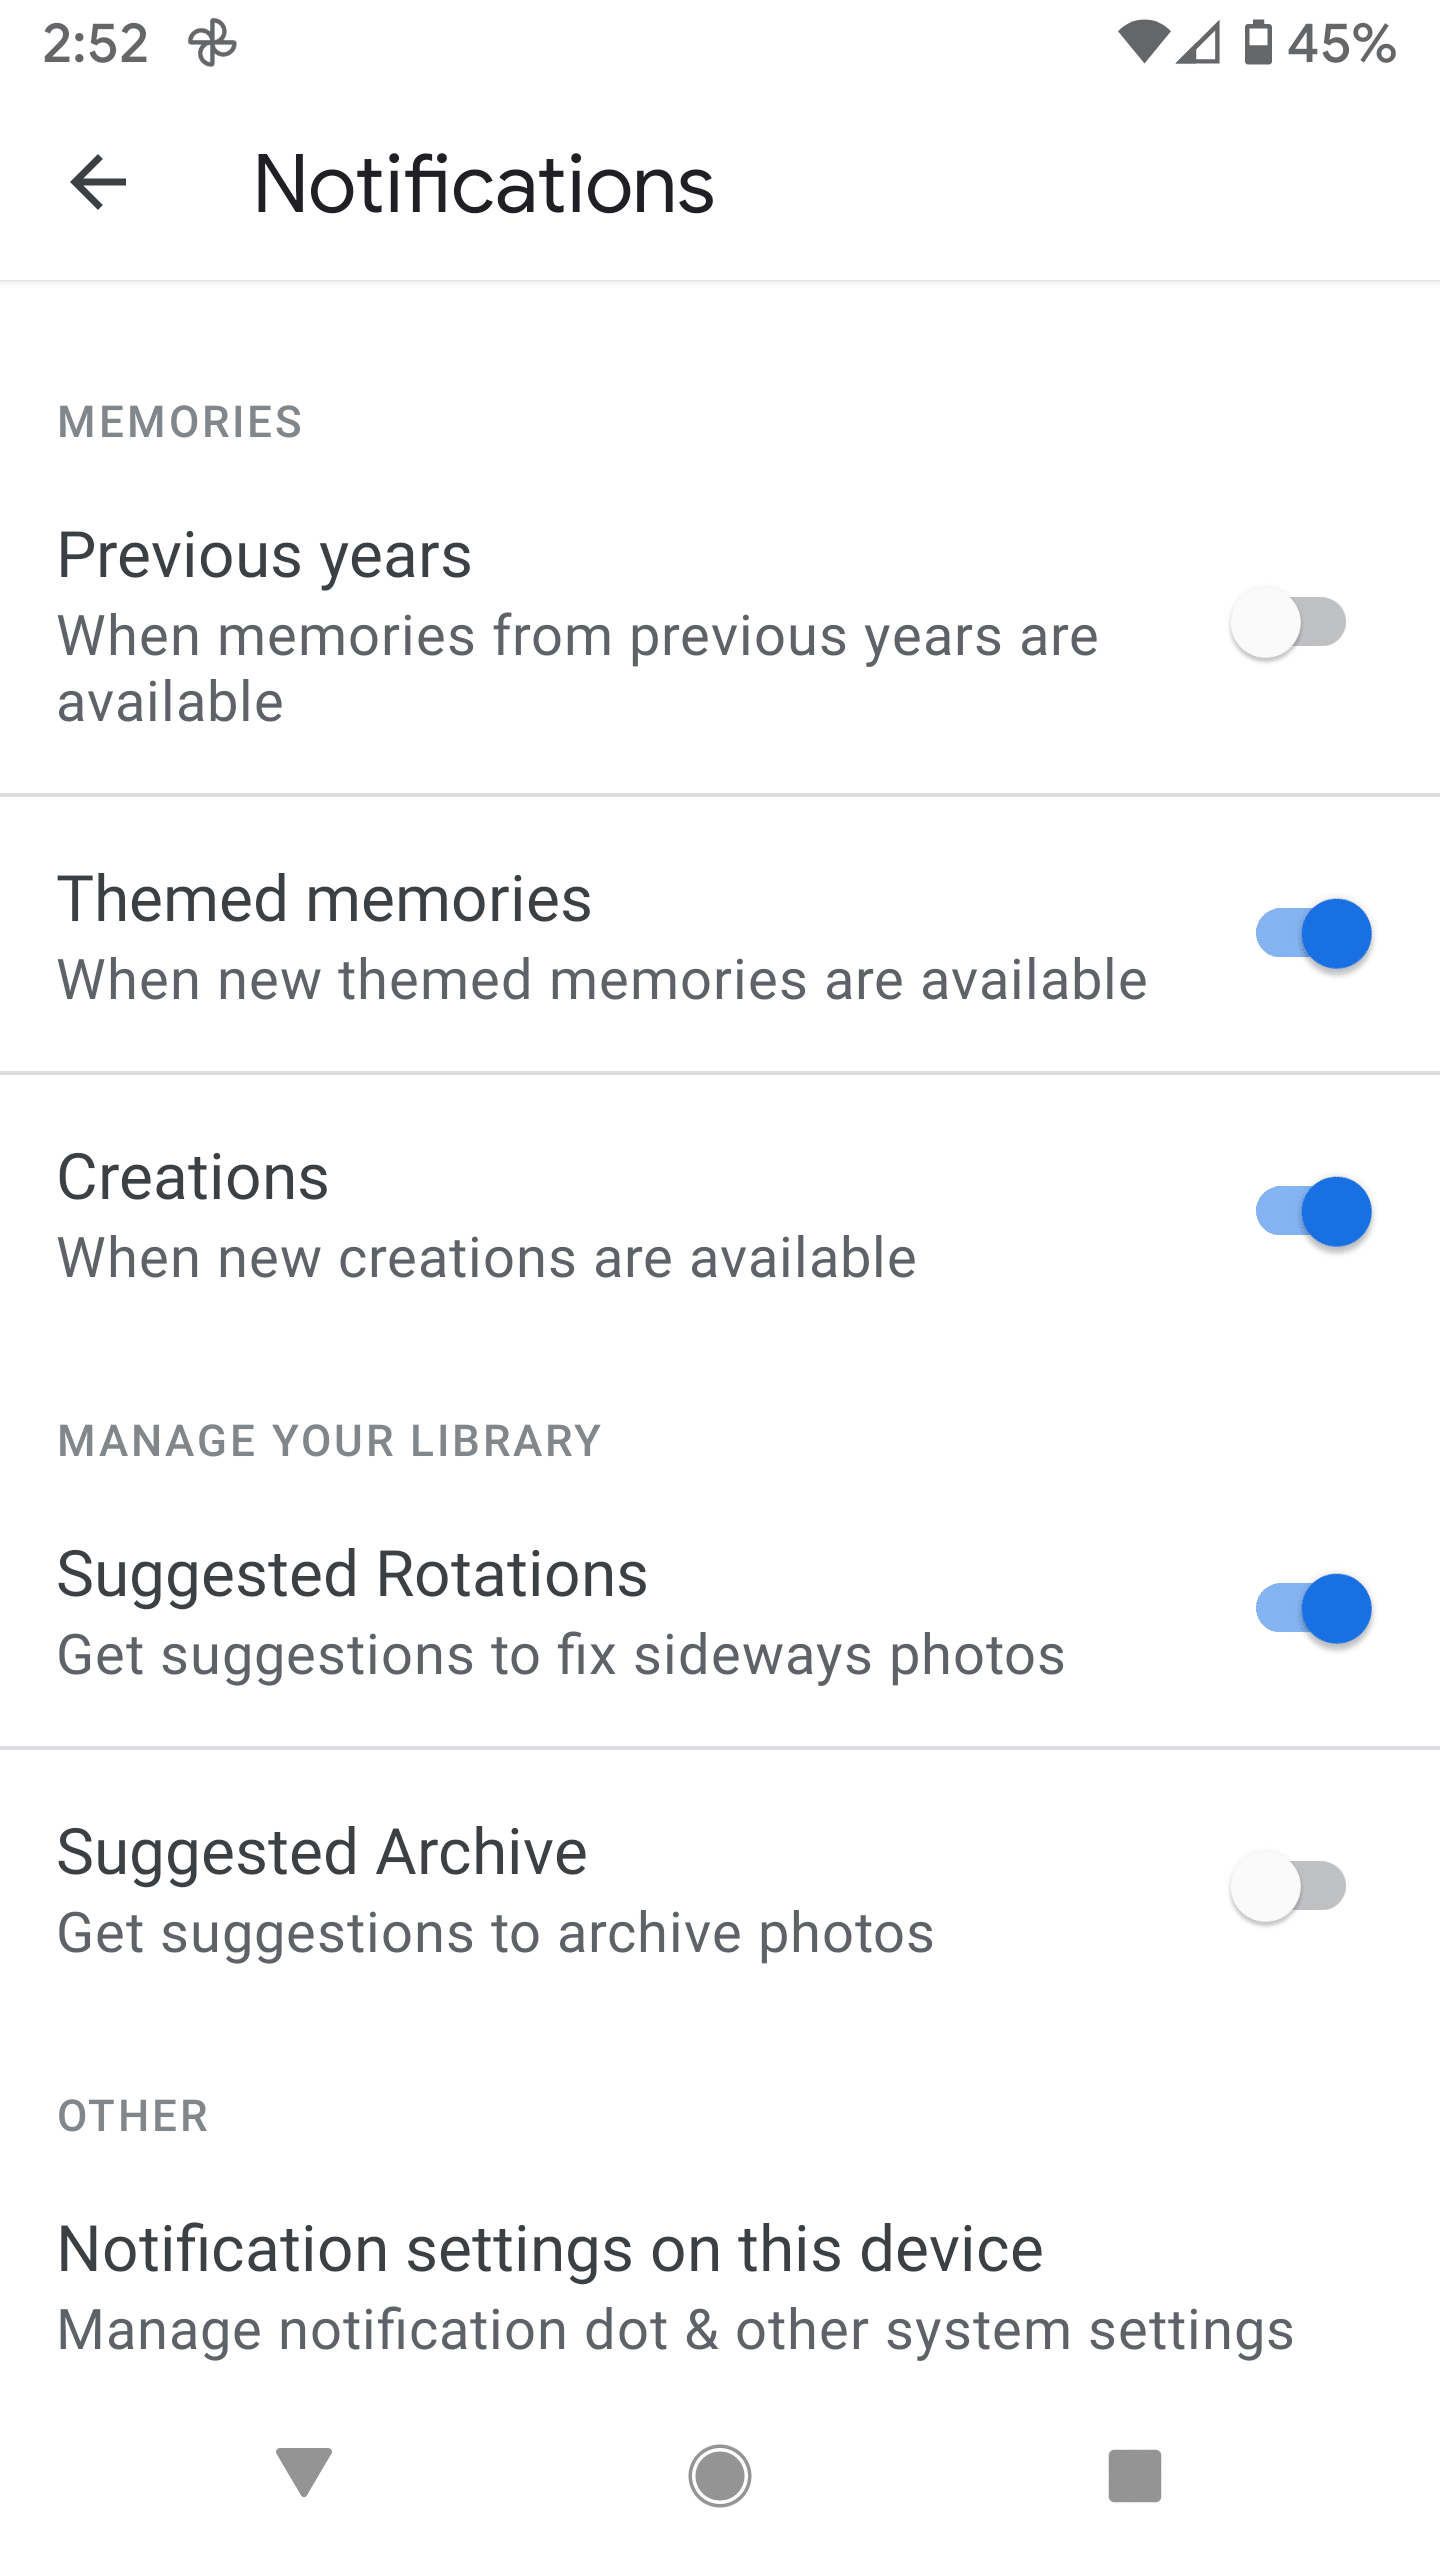
You can also choose when you want to see Memories notifications.
Reference: The Verge
သတင်းဆောင်းပါးများ ဖတ်ရှုနိုင်ရန် နှင့်ရသစုံ ဗီဒီယိုများကို လက်မလွတ်တမ်း ကြည့်ရှုနိုင်ရန် Mitelar Facebook Page , Mitelar Website နှင့် Mitelar Youtube Channel တို့တွင် အသေးစိတ် ဝင်ရောက်လေ့လာကြည့်ရှုနိုင်ပြီး Like နဲ့ Followလေးလုပ်ထားဖို့လဲမမေ့ပါနဲနော်…။


